It is a 1959 AMF DeWalt model 925. Dual voltage (120/240 volts) frame 235 motor (10/5 amps). This saw included a drop leaf table (original) and also features an electro-mechanical braking system.
Step 1 - Photograph the saw
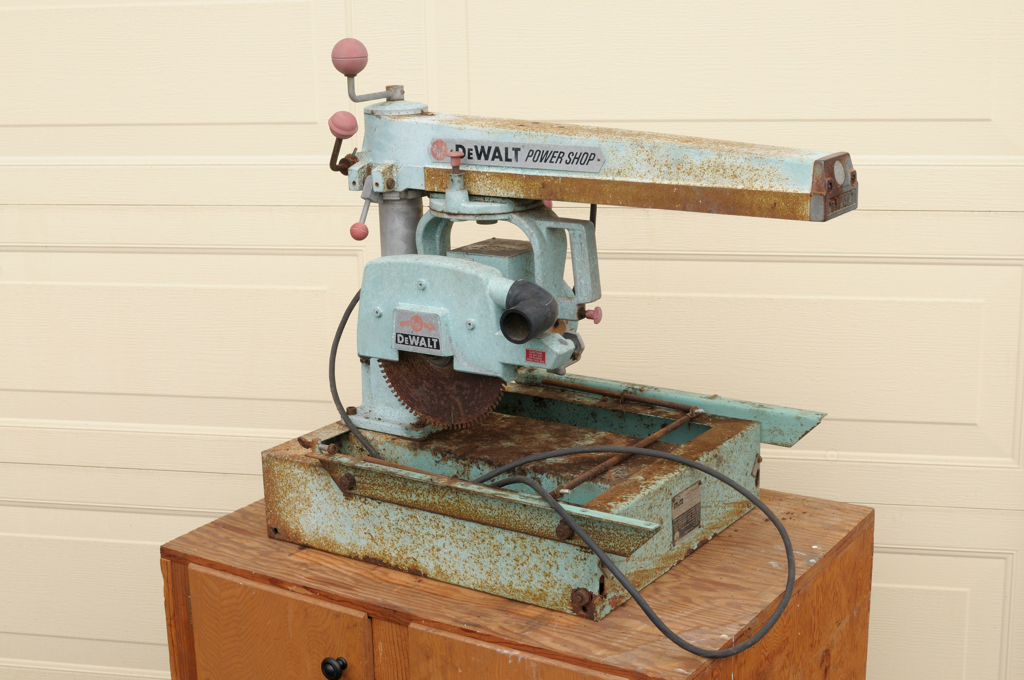
Despite the surface rust the initial inspection checked out fine. "What?" you're saying. "That thing is a wreck!" Maybe, maybe not. Back in Ye Olden post WWII days when things were designed and built by craftsmen it was a whole different ball game. These saws were so well designed and built that they could stand up to years of abuse or casual neglect and still be restored to "better than new" condition with a little effort. Simply put, they don't make them like this any more for any price. I invite you to travel along with me as I attempt to demonstrate the process. Let me warn you, though, this can become very addictive! Onward!
- One owner
- There were no signs of abuse.
- The ways were in great shape
- The arbor threads were in perfect condition
- Almost all the knobs were intact.
- The blade spins very freely and quietly
Step 2 - Spray frozen metal pieces with PB Blaster
Step 3 - Remove blade
Step 4 - Steel wool the ways. They are in great shape, No burrs or pitting at all.
Step 5 - Remove plastic knobs from locking pins and screw a 1/4-20 nut all the way onto the threads of the pins to free them with a wrench. Again, Perfecto! They freed right up.
Step 6 - Attempt to elevate the arm. It was stiff but will go up and down smoothly.
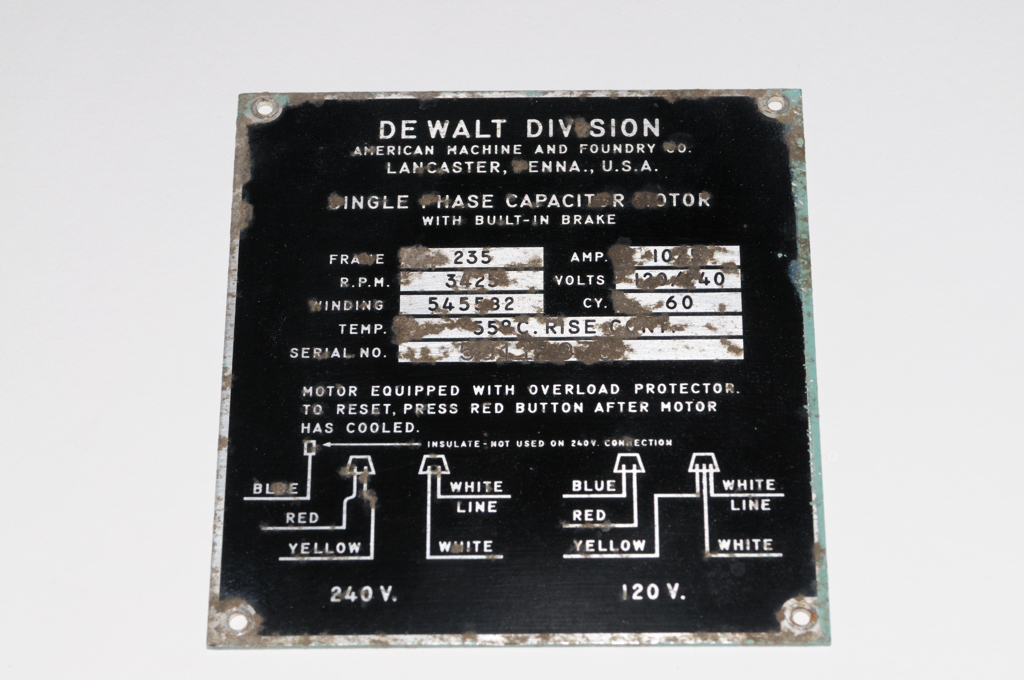
Step 7 - Open the motor up and confirm it is wired for 240 volts
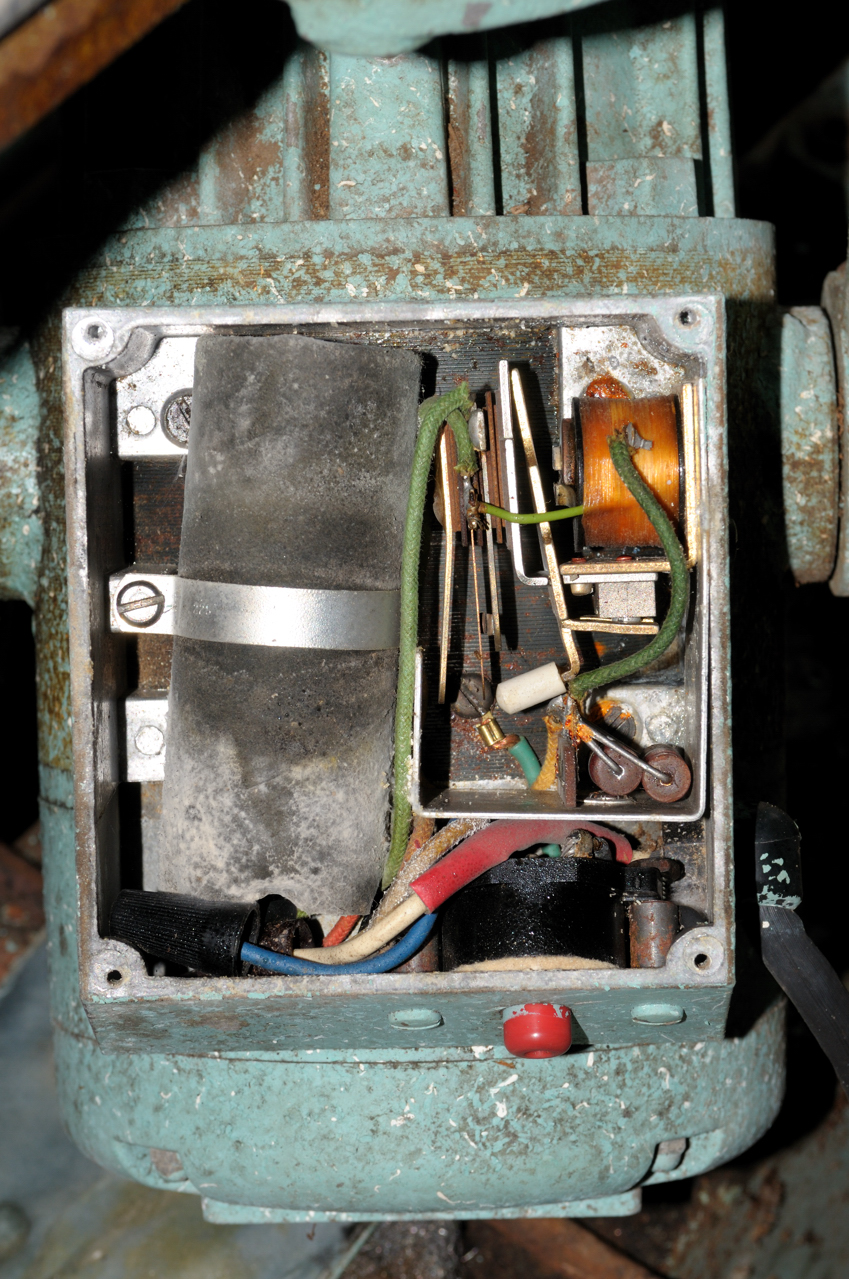
Ouch! Look at that moisture! It is wired for 240 volts, though. How do I know? Take a look...
Here is the motor badge with two wiring diagrams:
Here is the motor:
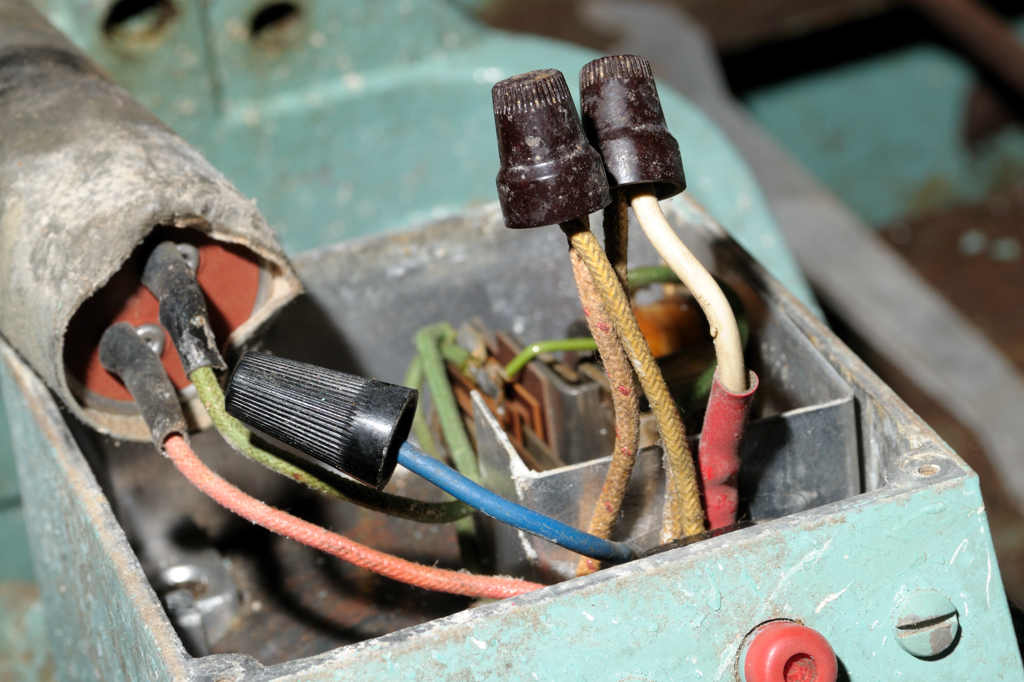
Note that the white "line" is connected to only one other wire.
Note that the "red" and "yellow" wires are connected.
Note that the blue wire in insulated from everything else.
This matches the diagram for 240 volt wiring in the first image.
The colors of the wire insulation fade over time so this usually a process of elimination. It is good practice to re-label the wires once you identify them.
The swollen capacitor is a little scary but I'm still going to plug it in and see what happens.
It runs! FYI, my garage shares a wall with a small laundry room. I created a 10 gauge extension cable that plugs in to the dryer outlet in the laundry room and powers my 240v motors in the garage. This will have to do until I can afford a new panel in the garage. I have 236 volts to work with according to my volt meter.
It is very noisy, though. Although it sounds like a crippled bearing my fear is that the noise is from the mechanical brake and not the bearings. I'll have to open it up and take a look.
What is "noisy"? A motor like this with no blade attached should basically hum when powered. Make the sound "hmmmmmmmmm" in a speaking tone of voice. That should be louder than the motor. It should not rattle or vibrate excessively. It should not heat up appreciably either. I'll talk more about this when we open the motor up and replace the bearings.
The capacitor is a 216-245 MFD 125V model. I will replace it with a modern Dayton 2MDR7 which is 216-259 MFD for $5.46:

That's all for today. Click here to read about RAS "ways".
Kent,
ReplyDeleteWhen choosing replacement capacitors I assume that the replacement part number would be different for different frames (motors)-correct? The 925 you're restoring is the standard (10amp) version, and the 925 was also produced with a 1.5 HP (Deluxe) motor.
What criteria does one use to determine the correct replacement capacitor for the various types of DeWalt motors? Is the reference simply done using the Amp/HP capacity of the motor, or a cross reference from the part number on the original capacitor?
Also, since you are providing a suggested brand and price-where are you ordering from?
Devils advocate-noob'd/
Ben.
IDK but the last time I checked, power = volts X amps ergo 240 X 5 = 1200 watts, and same if using 120V.
Delete1200 watts / 746(watts/HP) = 1.6 HP.
The same as my 925 deluxe. 1.5 HP
Hi Ben,
ReplyDeleteI generally use McMaster or Grainger for this stuff since there is a Grainger close to where I live. McMaster orders usually ship from Grainger as well but their site is a lot easier to navigate than Grainger's.
I just try to match the MFD and the physical dimensions of the original as closely as possible for the capacitor. My understanding is that matching the lower Farad number is the most important aspect. I don't claim to be an electrician but this approach has worked on the last 4 saws.
For capacitors that are mounted externally (M and G series) the modern capacitors are usually shorter. It's easy enough to get a new capacitor clip and tap a new threaded hole in the relay housing but keep your old capacitor top! The hole where the wires exit is on the opposite sides of the modern capacitor caps.
One quick note: All the images on this site are click-able to a larger version or, in the case of parts, to an online retailer for that part.
ReplyDeleteI just purchased a 925 deluxe model made in canada... The motor runs very smoothly, and the ways are in great condition from what I could see. The arm has some movement on the column, so I hope I can just adjust this.
ReplyDeleteI can't afford Mr Sawdust's book for a while because it's $50 USD with the shipping so close to $75 CAD by the time the credit card company dings me for the exchange rate and charges. But I'm pretty smart, I think I can figure much of it out reading a few blogs like yours